
Installing Oracle Tools on a Laptop [64-bit]
1). Install a Java 7 JDK – 64-bit version
Run the JDK installer file – jdk-7u21-windows-x64.exe
2). [optional] Install Oracle XE
There is no 64-bit Oracle XE for Windows, so 32-bit is the only option either way!
Expand the Oracle XE installer archive (OracleXE112_Win32.zip) into a folder – installHome
Start the Oracle XE installer file … installHome/DISK1/setup.exe
3). [optional] Install Oracle RCU into XE database
Expand the RCU zip file into its own directory – InstallHome
Start the RCU installation file … $InstallHome/rcuHome/BIN/rcu.bat
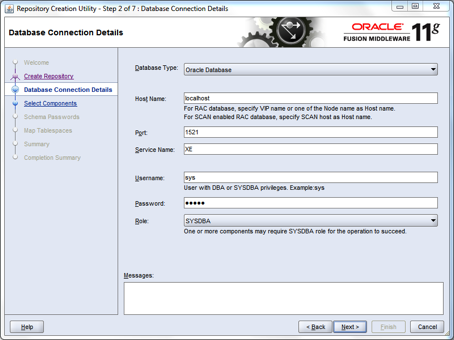
Fill in the details as above and click next.
An error message is displayed (see below); click on ignore

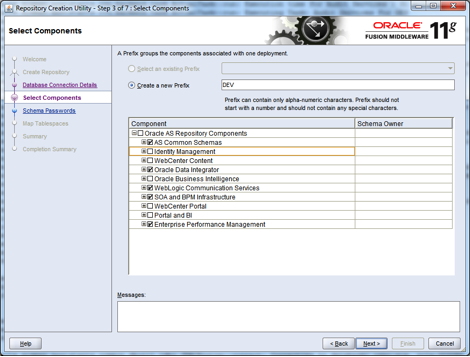
Select the schemas to be installed by the RCU utility – see checked boxes below
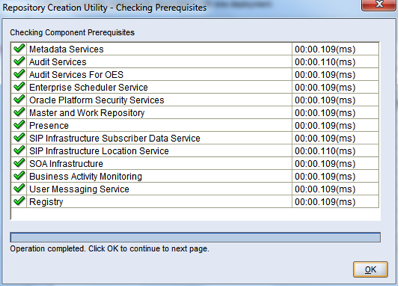
This should result in a successful pre-requisites check – see below.
In the next step, specify the same username/password for all the schemas – keep it simple
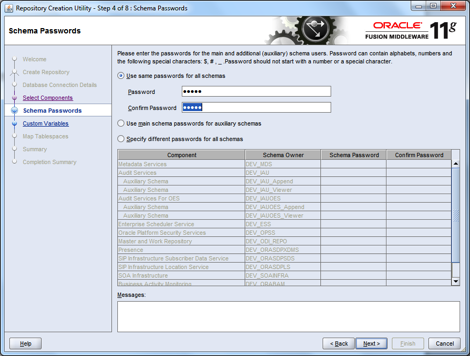
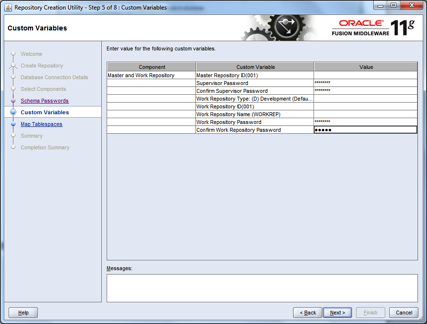
Use the same password on the next screen for the Supervisor and Work Repository password
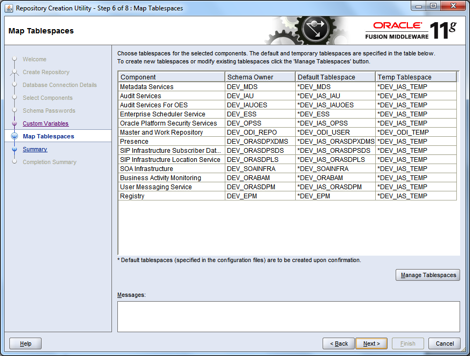
Accept the defaults on the next screen and just click on “Next”; when prompted about creation of non-existent tablespaces, click “OK” and continue. Click “OK” again after the tablespaces have been created.
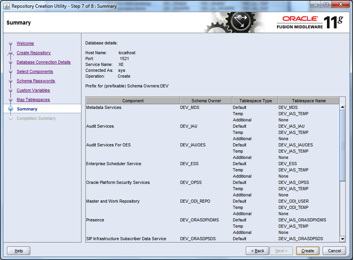
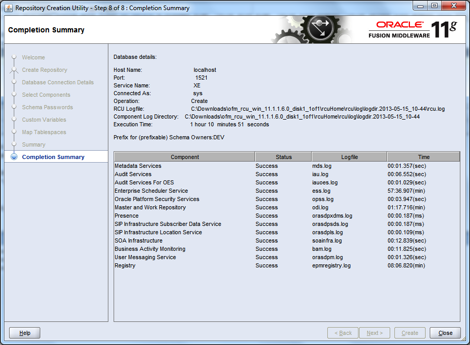
The next screen that appears will show a summary of the users and tablespaces that have been created, and prompt to create the data/records in the database; accept and click “Create”.
Ignore any errors and run the patch script (rcuFix.sql) at the end of the installation. The rcuFix.sql script contains the statements below:
ALTER SESSION SET CURRENT_SCHEMA = dev_epm;
CREATE VIEW “ESS_FAILOVER_ACTIVE_NODE_VIEW” AS SELECT R.CLUSTER_NAME, LEASE.HOST_NAME, LEASE.PORT_NUMBER, LEASE.SECURE_PORT_NUMBER FROM ESS_FAILOVER_RESOURCE R LEFT JOIN ( SELECT LO.PORT_NUMBER, LO.HOST_NAME, LO.SECURE_PORT_NUMBER, L.RESOURCE_ID from ESS_FAILOVER_LEASE_OWNER LO, ESS_FAILOVER_LEASE L WHERE LO.LEASE_OWNER_ID = L.LEASE_OWNER_ID AND SYSTIMESTAMP < L.EXPIRY_TIME ) LEASE ON R.RESOURCE_ID = LEASE.RESOURCE_ID WHERE R.RESOURCE_NAME=’essbase.sec’ ;
ALTER SESSION SET CURRENT_SCHEMA = sys;
GRANT EXECUTE ON utl_file TO dev_ess;
ALTER PROCEDURE dev_ess.write_line COMPILE;
SHOW ERRORS;
In the next window that opens, click on “Close”
4). Install Oracle OEPE into a new WebLogic home
Start the OEPE installer file – oepe-wls-???-installer-11.1.1.?.0……win32.exe
Accept or specify C:\Oracle\Middleware as the new Oracle home

Uncheck the box to receive security updates by email and click “Yes” when prompted to continue. In the next window, select the “Custom” install option.
Ensure that the “Server Examples” box is checked (below)
Accept the default settings in all the windows that follow and proceed to the end of the installation.
5). Apply OSB extension to the WebLogic home
Expand the OSB extension archive – ofm_osb_generic_11.1.1.?.0_disk1_1of1.zip
Open a DOS window and navigate to installerHome/Disk1
Run the setup.exe file … setup.exe -jreLoc pathToJavaJREHome
In the window (2 of 9) that appears, choose to skip the check for Software Updates
In the next (3rd) window, choose the existing middleware home that was created for the OEPE install (C:\Oracle\Middleware) and select Oracle_OSB as the home directory, and click “Next”
In the next (4th) window, accept the default (Typical install) and click “Next”
The next window automatically validates the machine against the requirements of the software; click “Next” to continue.
On the next window (6th), confirm the defaults for the Weblogic home and OEPE home by clicking “Next”
In the window that follows; click on “Install” to begin the installation process for the OSB extension to the WebLogic home.
After the installation is completed (100%), a new window opens; click “Next”
In the last window, click “Finish” to complete and exit the installation
6). Apply SOA Suite extension to the Weblogic home
Expand the first SOA suite extension archive – ofm_soa_generic_11.1.1.?.0_disk1_1of2
Expand the second SOA suite extension archive – ofm_soa_generic_11.1.1.?.0_disk1_2of2
Open a DOS window and navigate to installerHome/Disk1
Run the setup.exe file … setup.exe -jreLoc pathToJavaJREHome
Select “Skip Software Updates” and click “Next”
The next step is a prerequisites check; it should always succeed. Click “Next” to continue
Accept or specify “C:\Oracle\Middleware” as the middleware home and click “Next”
Confirm the application server type and location and click “Next”
This is a confirmation page, just click “Install” to continue
After a while, you will be prompted for disks 4 and 5; edit the path as shown in the next two screenshots: …disk1_2of2\Disk4… and …disk1_2of2\Disk5…
The installation should take a few minutes to complete, click “Next” when it reaches 100%
The next screen is just for confirmation of what was installed; click “Finish”
7). Install JDeveloper
Run the JDeveloper installer file – jdevstudio1111?install.exe
Accept or specify C:\Oracle\MiddlewareJDev as the new Oracle home
For some strange reason, JDeveloper did not install into the existing middleware home!
Accept the default install option “Complete”. Click “Next” to continue
Confirm the installation directory and click “Next” to continue
Accept the default access for all users and click “Next”
Confirm the planned installation summary and click “Next”
Installation takes only a few moments. On the final page, ensure that the “Run Quickstart” button is checked, and then click “Done” to exit the install program
On the quick start page, select the second option: “Launch Oracle JDeveloper”
When JDeveloper starts for the first time, the following window is displayed. Make sure to select the “Default Role”, and at the bottom of the window, uncheck the checkbox that says: “Always prompt for role selection on startup”
Another popup window appears, this time select all the boxes to ensure that those file types are associated with JDeveloper on your computer
When JDeveloper starts, you will be prompted to check for new updates that are available (at the right-side bottom of the screen). If this does not happen, from the menu and select the Help submenu, and under it select “Check for Updates” (see screenshot below)
In the window that pops up, select the following entries:
Oracle BPM Studio 11g 11.1.1.?…
Oracle SOA Composite Editor 11.1.1.?…
Spring & Oracle Weblogic SCA Version… [optional]
Click “Next” when you are finished
One or more of the selected items may require a confirmation of agreement with license terms, select “Yes” to accept and continue with the installation
When all the updates have been applied, a confirmation page will be displayed; click “Finish”
A popup box appears, prompting a restart of JDeveloper; click “Yes” to accept
8). Create a WebLogic domain with OSB & SOA Suite extensions
To enable the running and deployment of services locally on a PC or laptop, a WebLogic domain must be created with support for these features.
From the Quick-start screen (see page 20), select the first option: “Getting Started with WebLogic Service 10.3.5”, and the following screen appears. Select “Create a new WebLogic domain” and click “Next” to continue
Ensure that the options selected below are all checked
On the next screen, accept the defaults and click “Next”
Set the administrator username and password to, “weblogic” and “welcome1”, respectively
Accept the defaults for “Development Mode” and “Available JDK”
For the JDBC options, check all the boxes and then use the values below for, Vendor, DBMS/Service, Host Name, and Port.
Set the password as you choose, and select the Oracle driver for the Driver option
The next step validates the JDBC configuration, this should all run successfully!
Check the boxes for “Administration Server” and “Managed Servers, Clusters and Machines” to fine-tune your installation in order to reduce the disk, memory and maintenance footprint
Accept the default name and port for the admin server, but check the box for “SSL enabled” and click “Next” to continue
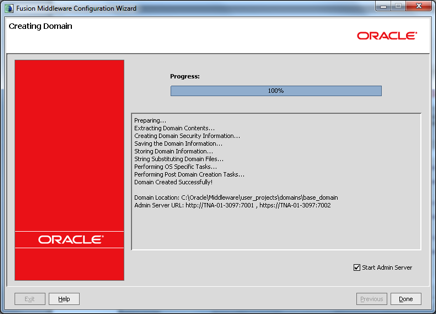
The next window opens with a summary of the installation that is to be performed, click “Create”
The install should take a few minutes, after which the summary page shows 100% progress. Check the box for “Start Admin Server” and then click “Done”. That’s it!
—
Oyewole, Olanrewaju J (Mr.)
Internet Technologies Ltd.
lanre@net-technologies.com
www.net-technologies.com
Mobile: +44 [0] 793 920 3120