Kubernetes-to-AWS Security Bridge

AWS Kubernetes RBAC Bridge

Background

Security in an interconnected, always-on (24*7), virtualised, digital world is important. As more of our IT infrastructure moves to the Cloud, proactively seeking and blocking emerging security gaps becomes a continuous activity (BAU).

AWS and Kubernetes are leaders in the new paradigm of abstracted infrastructure – Cloud, datacentre on on-premise. Both have their own evolving security arrangements. For role-based access control (RBAC), AWS uses the IAM primarily, while Kubernetes (K8s) uses a combination of Roles and Role Bindings. The primary RBAC intersection point between these two has been the node/virtual-machine (EC2).

The Problem

In a simple world, privileges assigned to the underlying AWS node are inherited by the K8s Pods running on the node. This works perfectly when there is a one-to-one mapping between the client of K8s and the consumer of the AWS node. Specifically; the same entity owns the K8s cluster and the AWS node on which it runs. Security is intact, irrespective of the number of K8s Pods on the AWS node. However, misalignment occurs when K8s shares the same node among two or more clients – often referred to as multi-tenant mode. A potential for a security breach emerges.

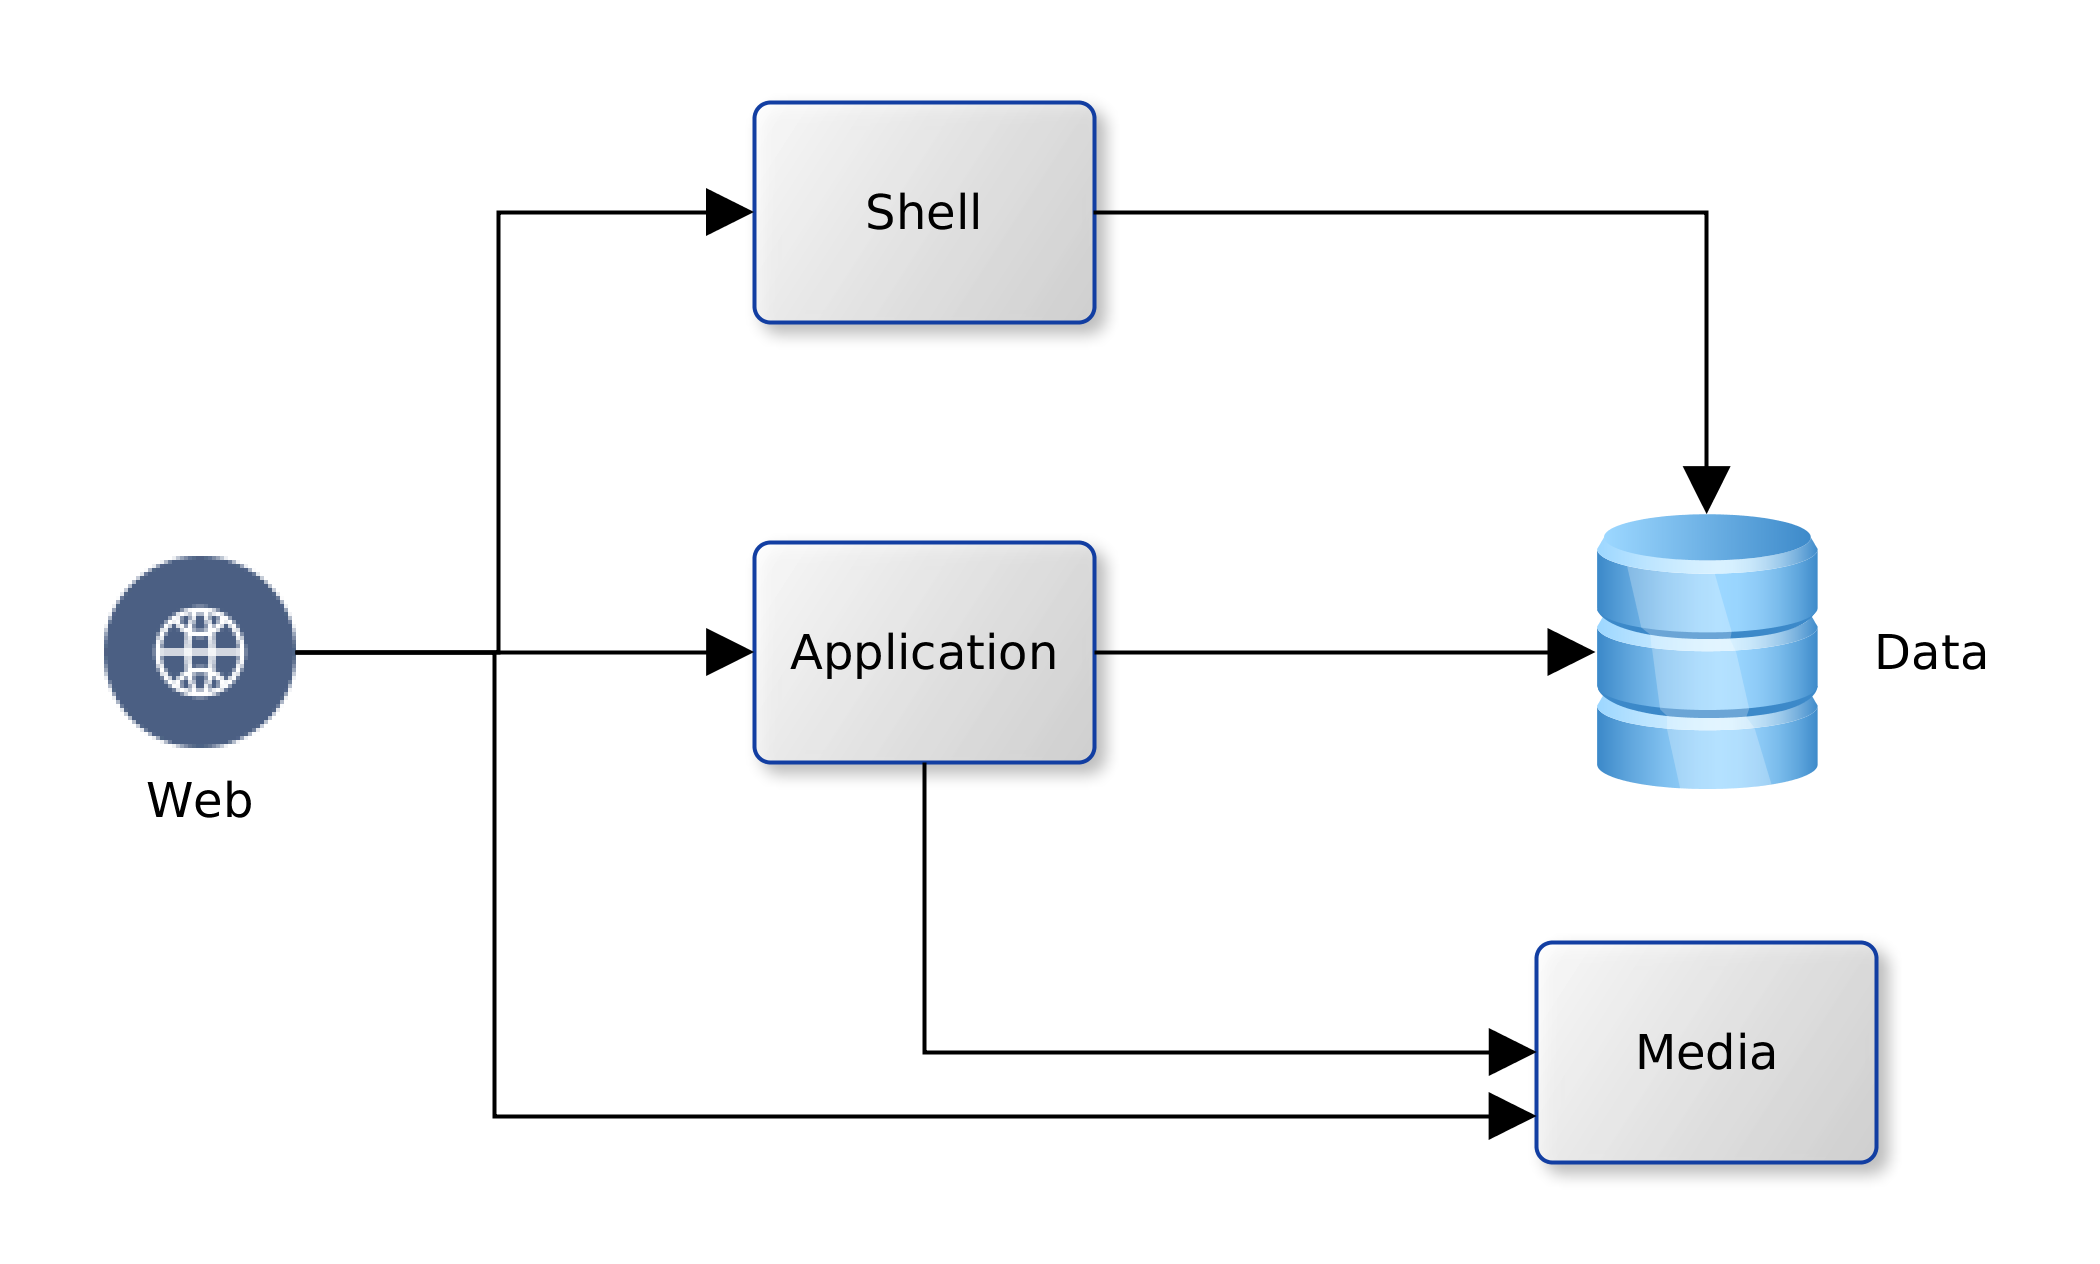
Imagine a scenario in which there are three K8s Pods (A, B & C) running on a single AWS node. Each Pod runs a service that belongs to a different customer/client. Pod A belongs to client-A, Pod B belongs to client-B and Pod-C belongs to client-C. Files needed by each client are stored on S3 buckets in AWS, and each client has responsibility to arrange for their own S3 bucket. However, client-C is the only one that has managed to provision an S3 bucket at the time of deployment. Ordinarily, Pod A and B should never access the resource(s) provided strictly for Pod C. But if they do, nothing stops them! The diagram below provides a useful illustration.

K8S-AWS-RBAC_Quandary

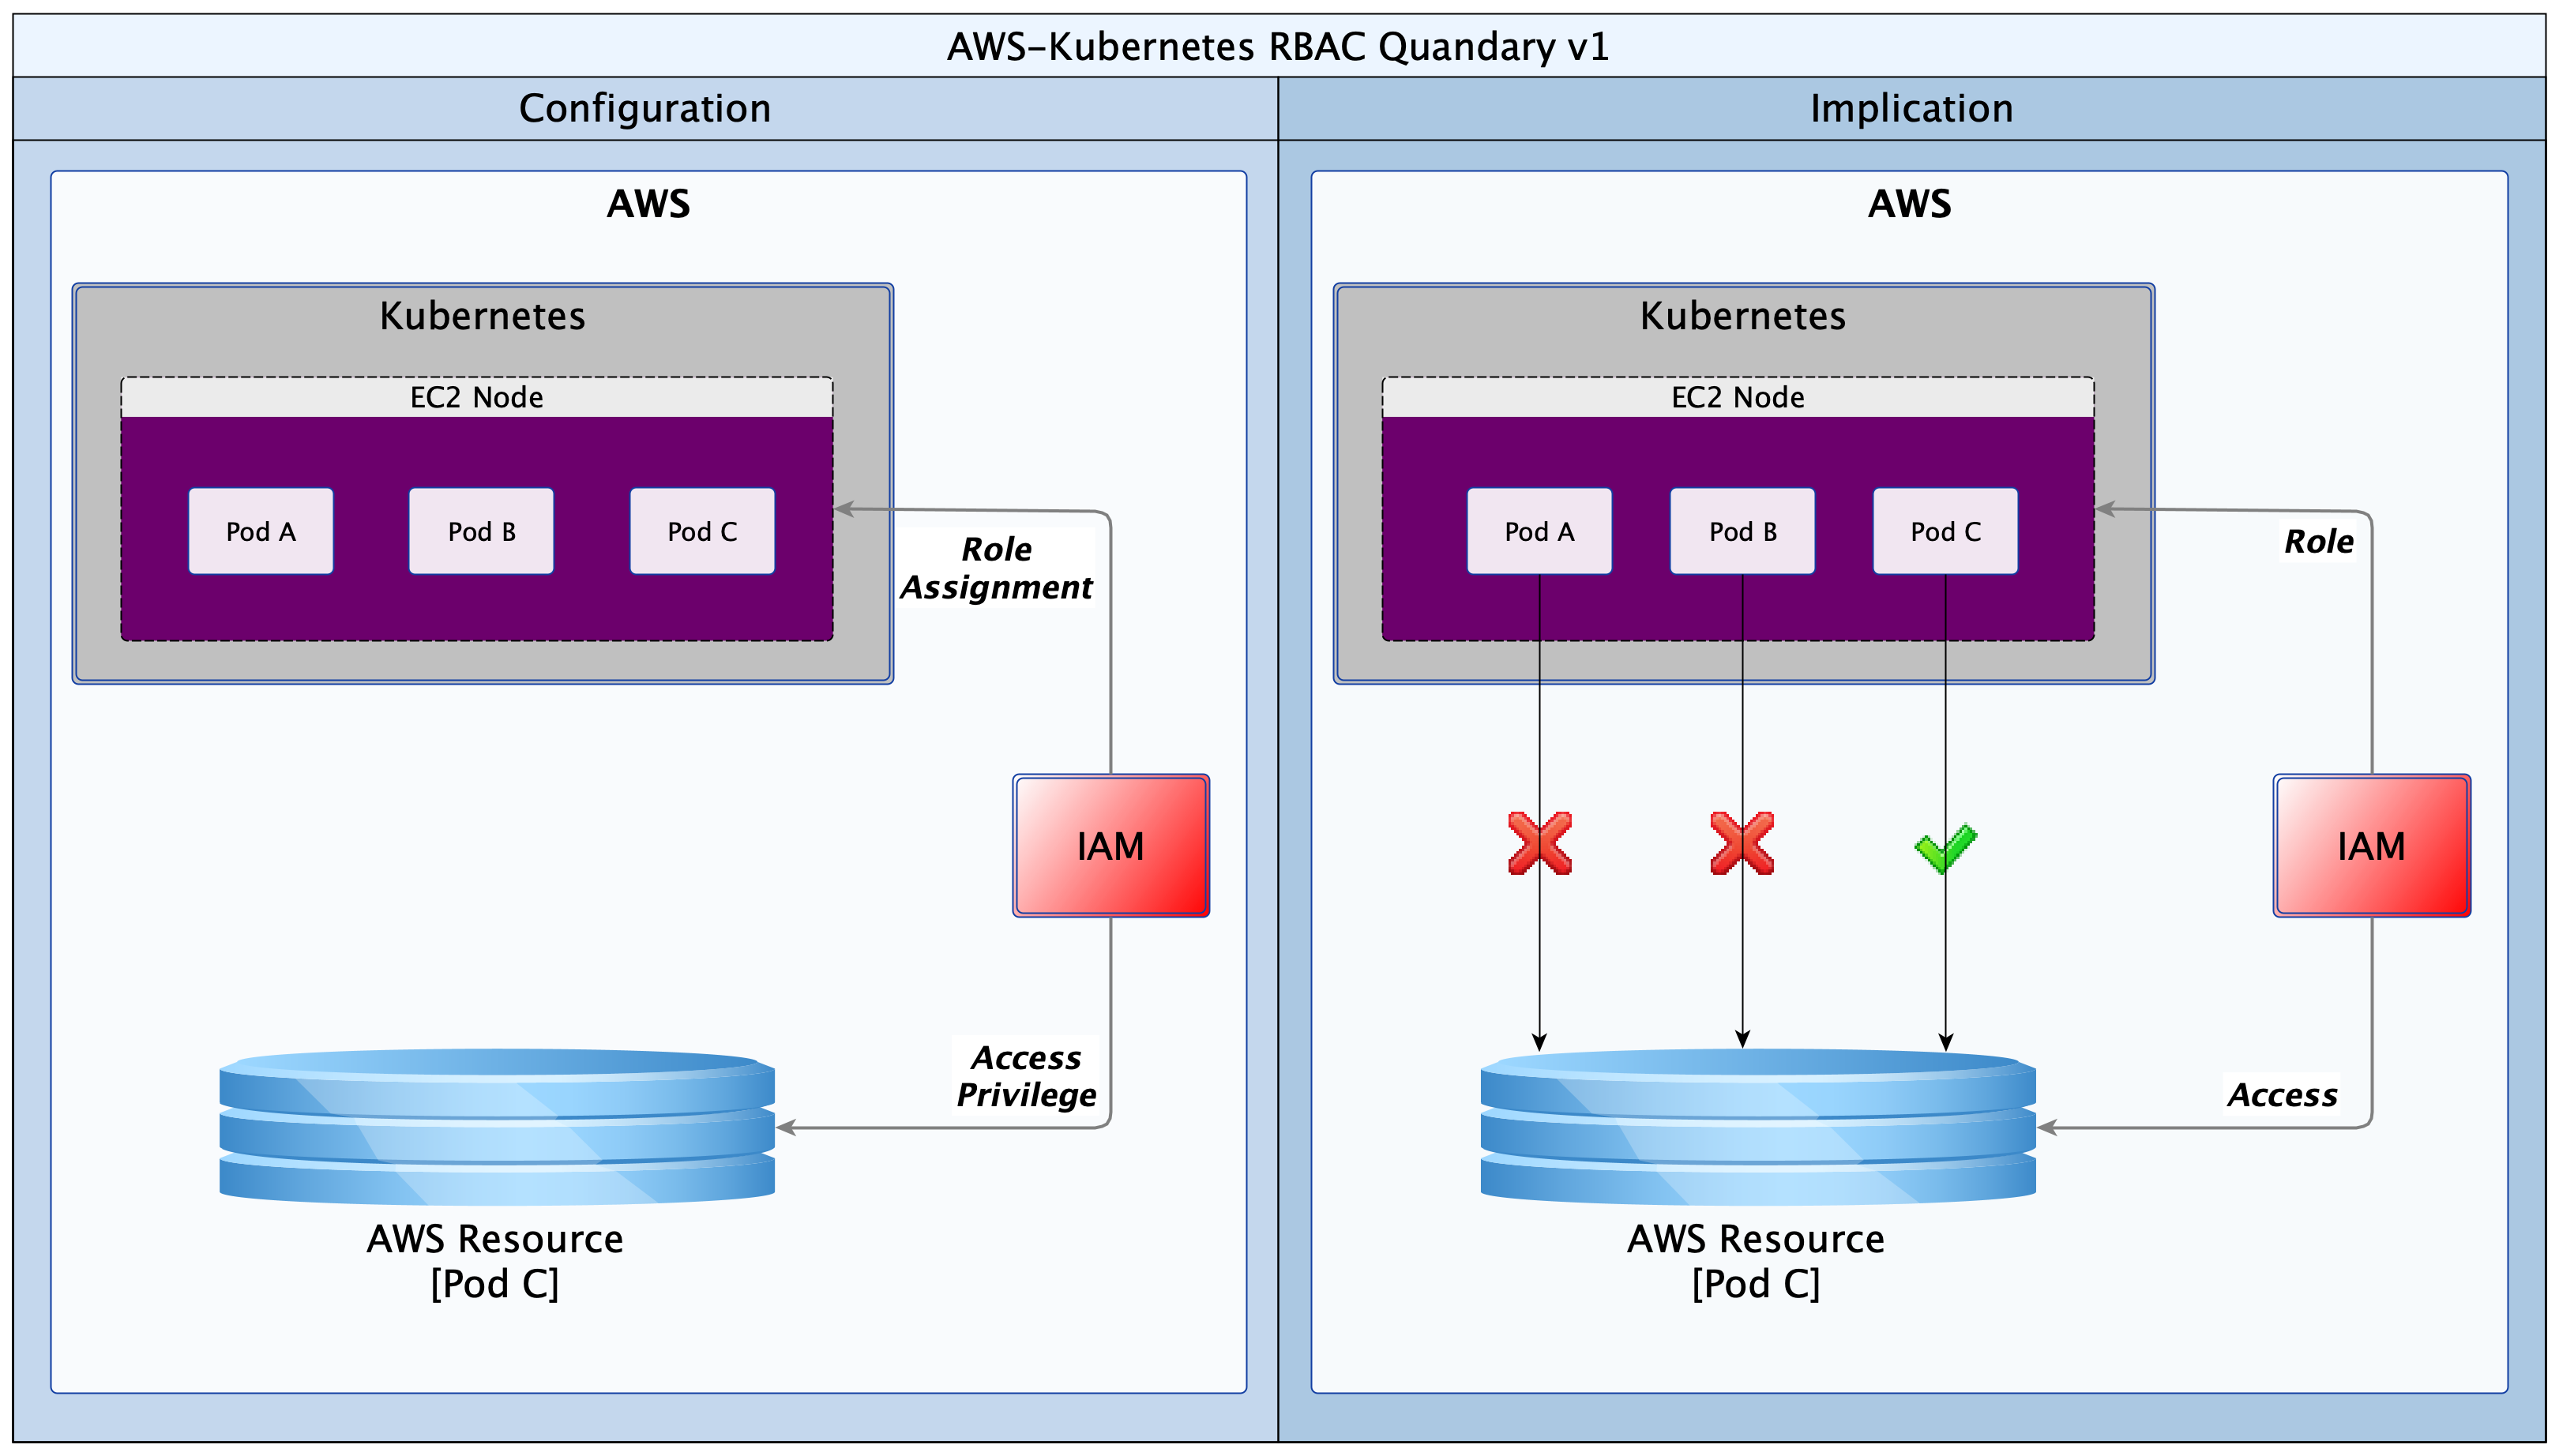
Historically, in IAM, access privileges to the resource for Pod C will have been given to the node hosting Pods A, B and C. The EC2 node would have an Instance Profile defined, and a Role will be attached to the Instance Profile, giving it those privileges. The unexpected consequence however is that Pods A and B also inherit the privilege from the host node. Pod C’s resources would therefore be accessible to any other Pod (client) running on that node. This obviously is not acceptable for a multi-tenant K8s cluster.

Solutions

The great thing about the Open Source community is that problems are attacked, and often solved, almost as soon as they are articulated. Two open source products emerged to close this security gap: Kube2IAM (2016) and KIAM (2017). Some time later, AWS introduced a solution; “IAM for Service Accounts”. However, the AWS solution only works with their EKS service. All three solutions make it possible to control access from K8s Pods to AWS resources.

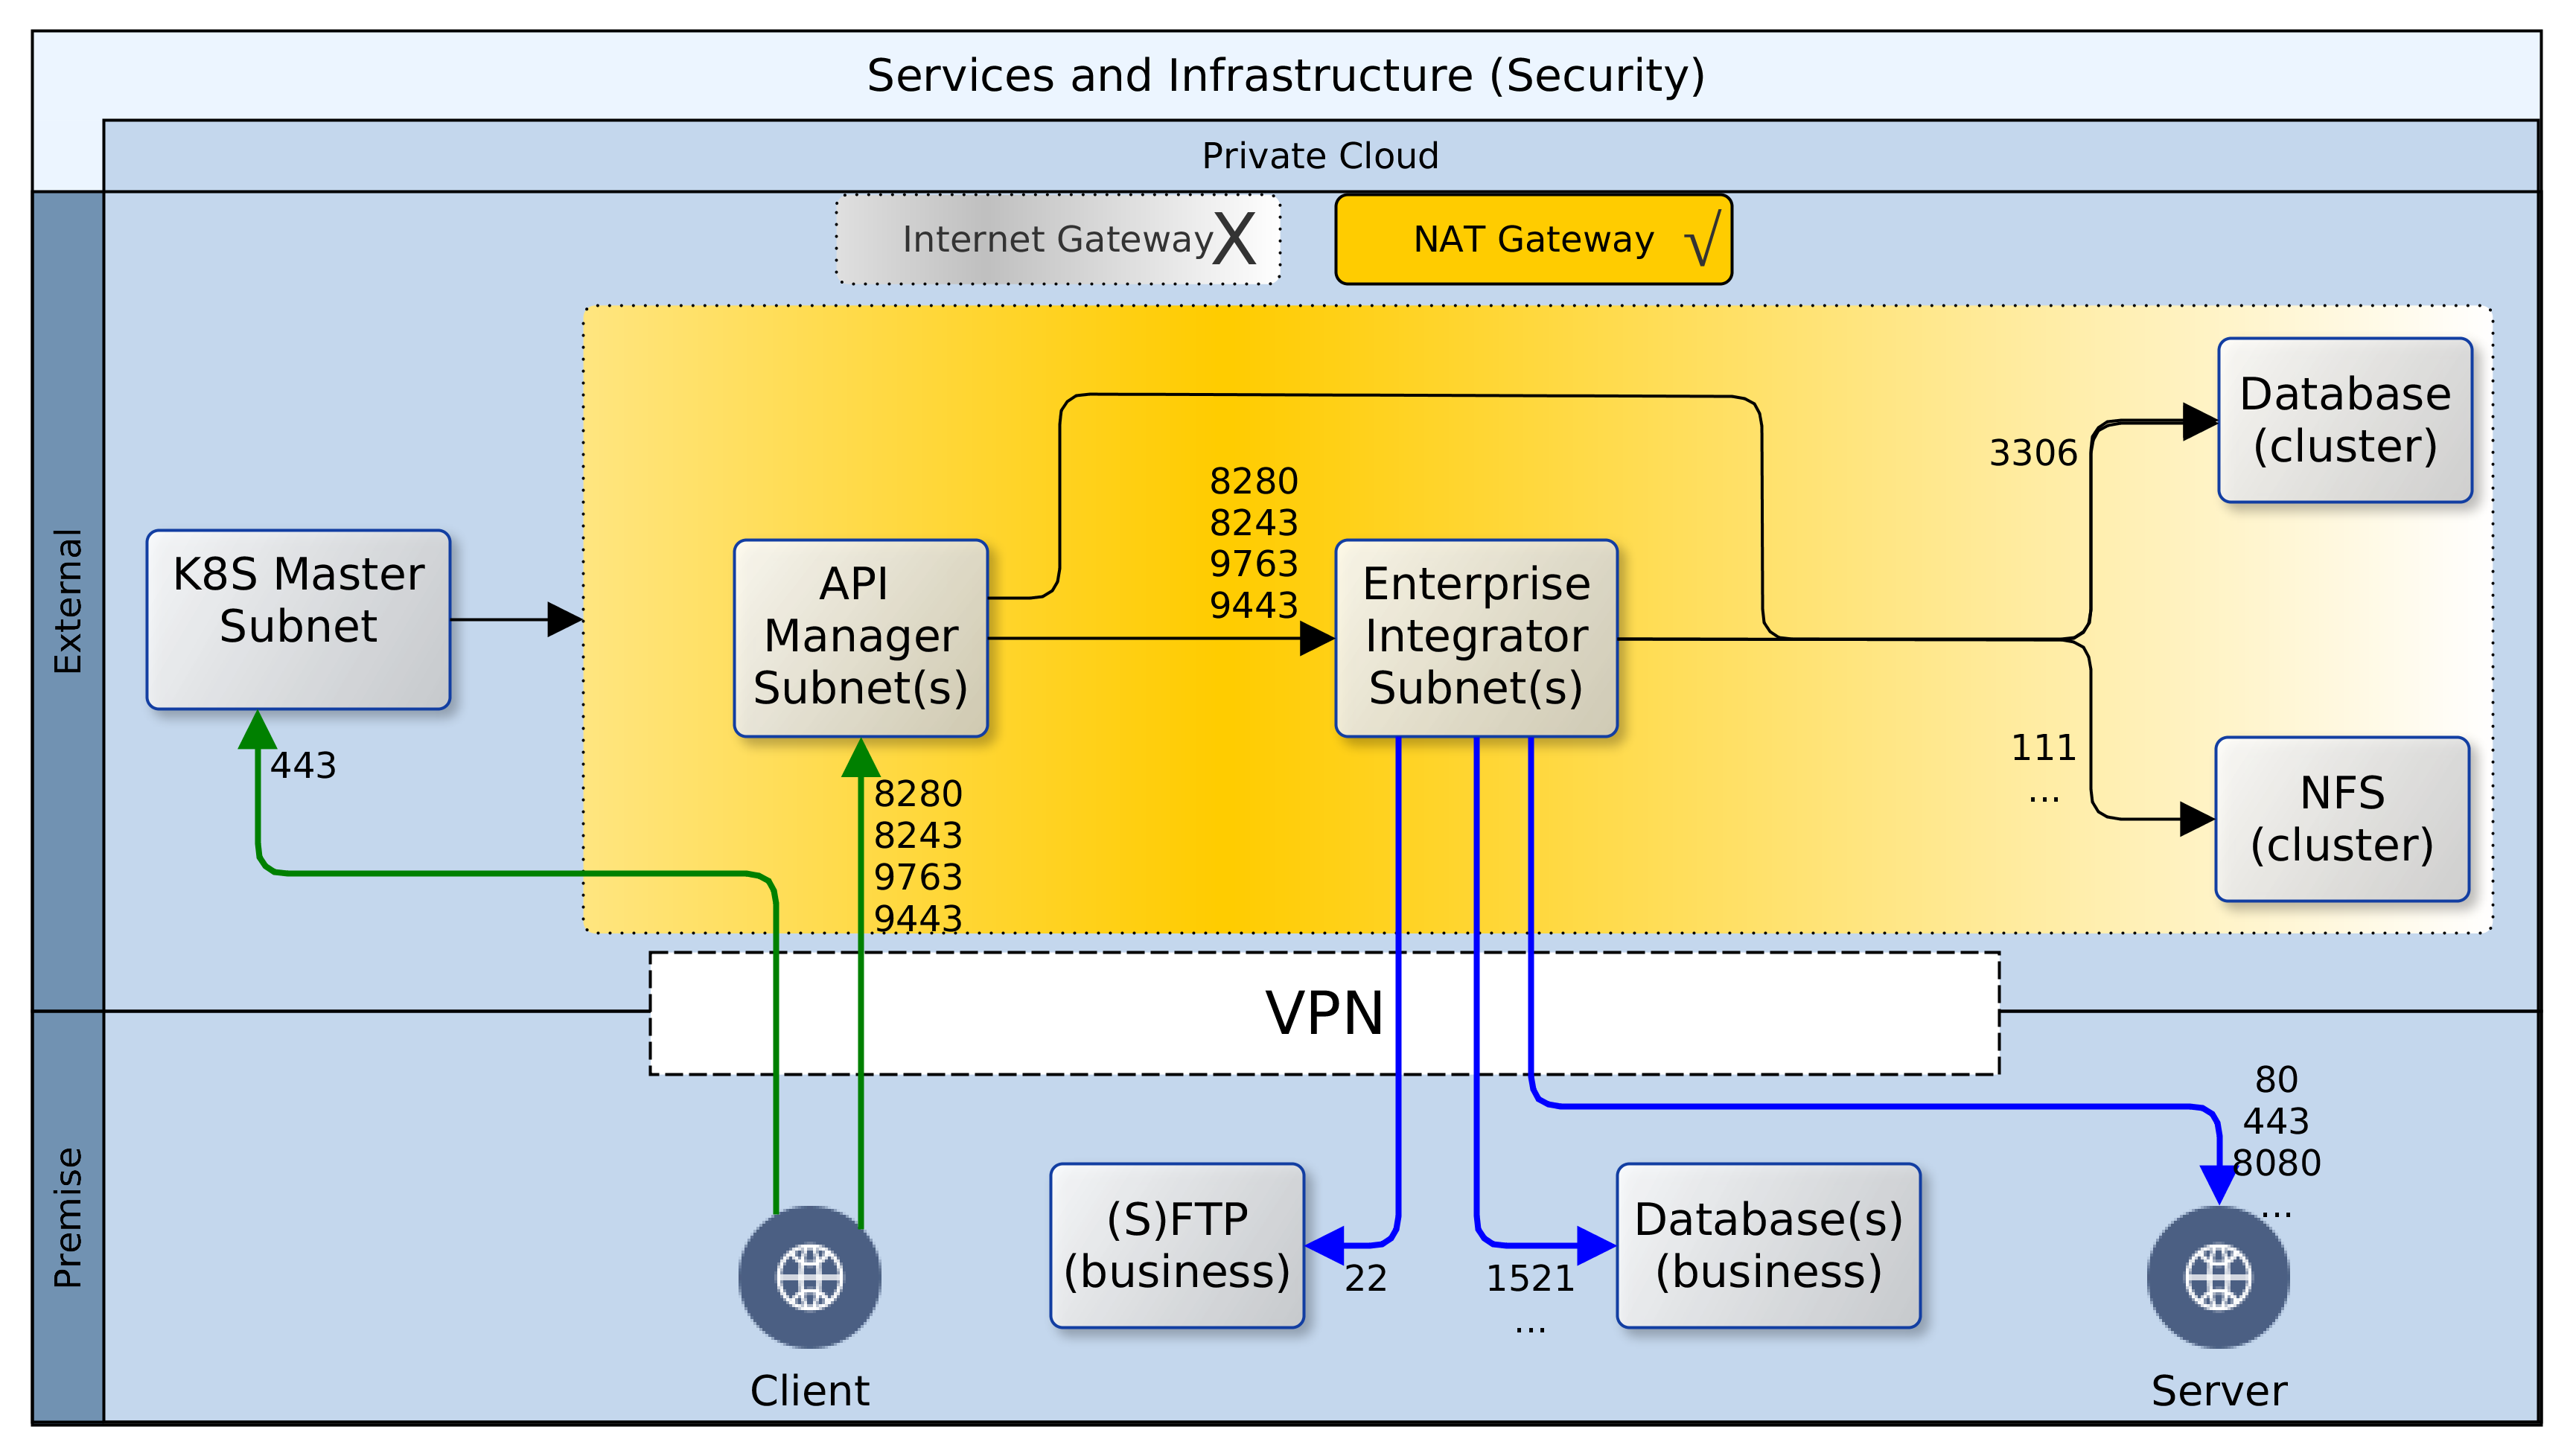
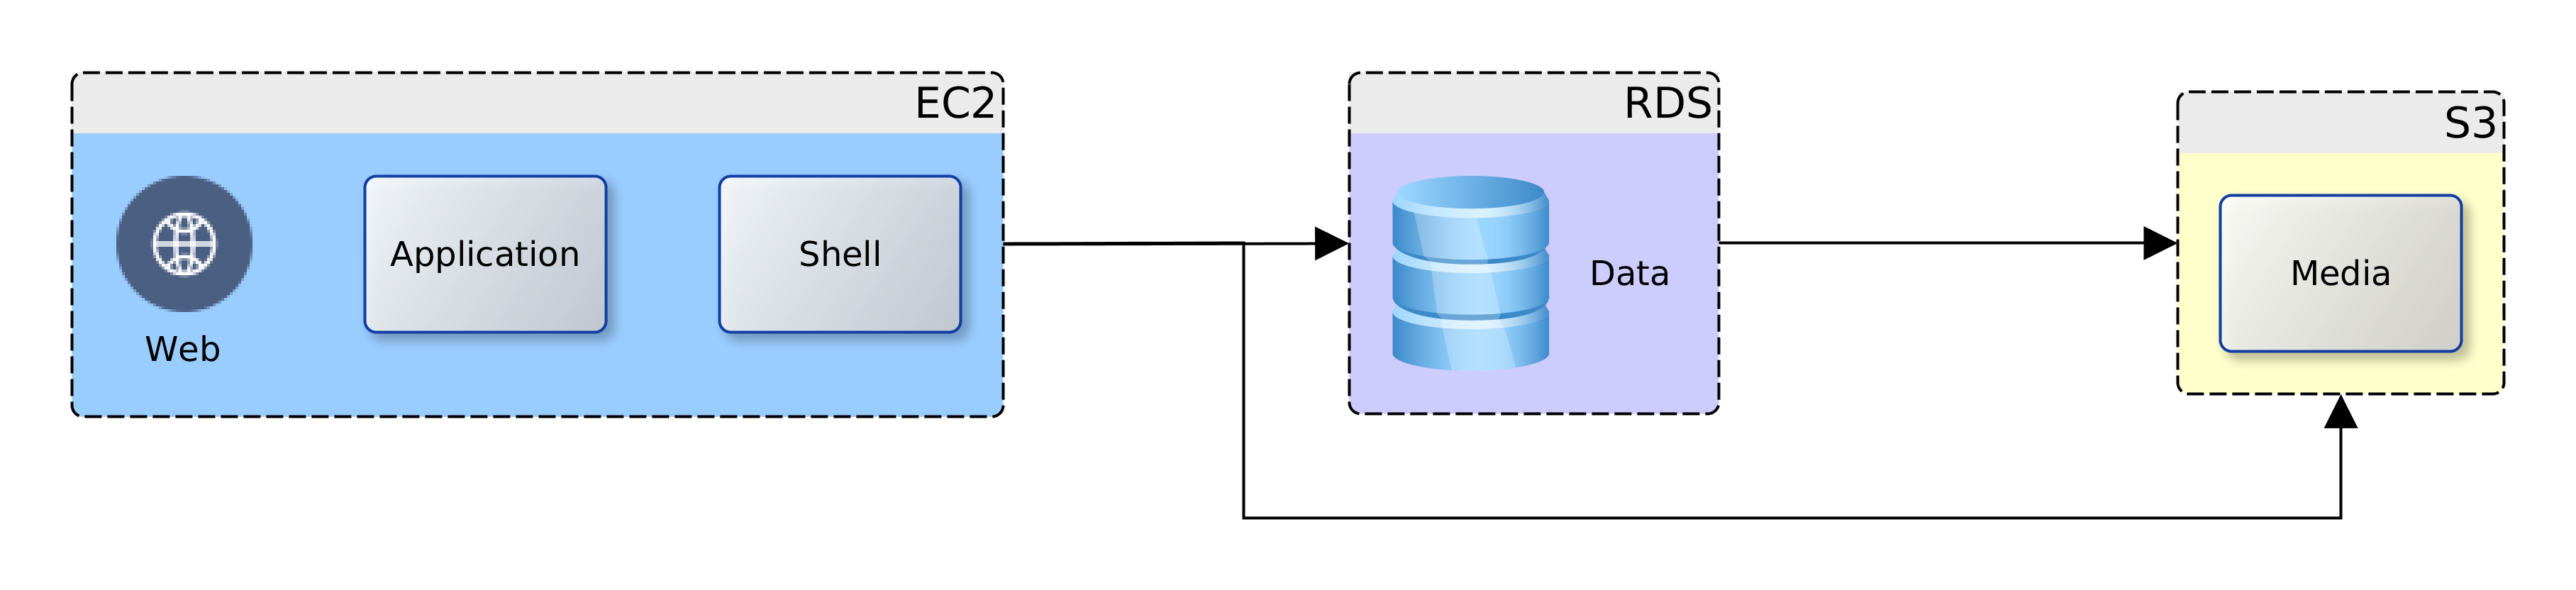
I will not discuss the AWS solution as it is proprietary and closely tied to their EKS offering. Neither will I examine KIAM as the solution has been abandoned by the developers. This leaves us with the forerunner: Kube2IAM. Kube2IAM deploys a K8s DaemonSet in the K8s cluster. By default, one Kube2IAM Pod is deployed to each worker node in the cluster. The Kube2IAM instance running on each node intercepts requests to the AWS metadata service URL (http://169.254.169.254). It then provides a response according the the IAM role assignments, as well as the annotations on the Pod calling the service. The diagram below provides a useful illustration.

AWS Kubernetes RBAC Bridge

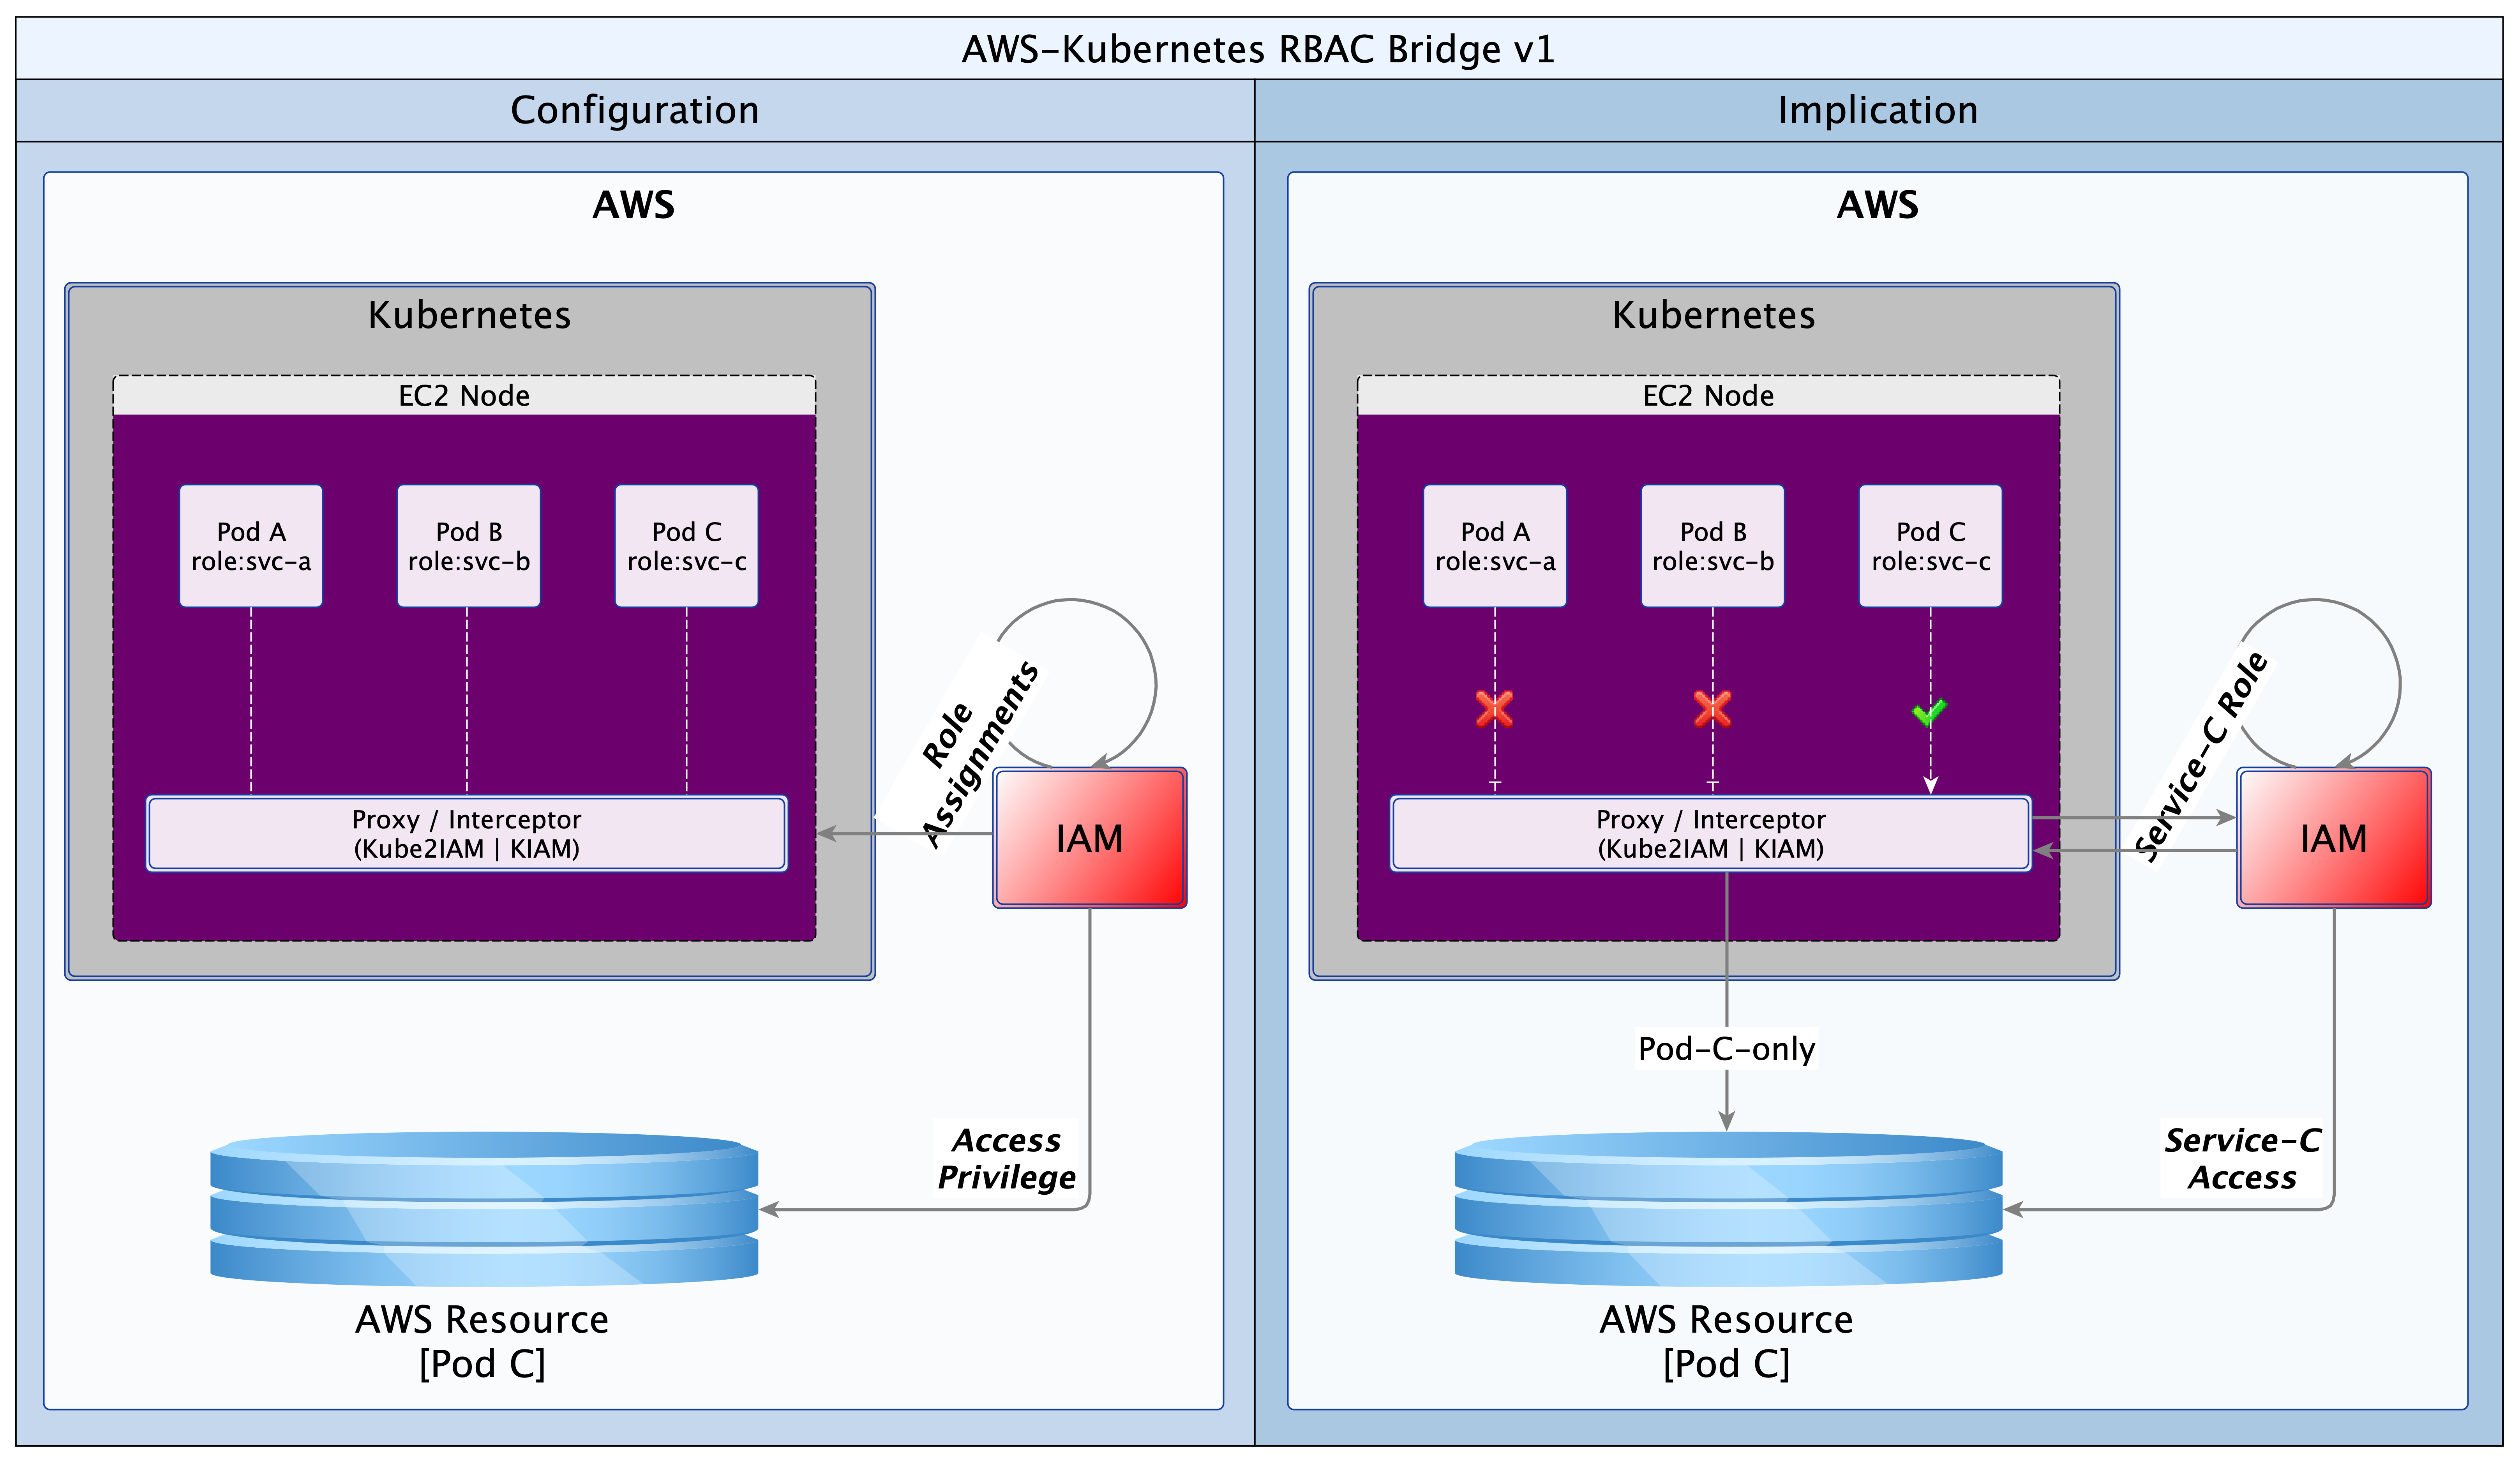
With this simple solution by Kube2IAM, the exclusive role assignment to Pod C is respected by K8s. Deliberate or inadvertent requests by Pod A or B are blocked by Kube2IAM.

Here is how it works. When a Pod makes a request for AWS resources, it will make a call to the AWS metadata service URL. Kube2IAM hijacks the call (iptables reroute) and performs an inspection to see what the appropriate response should be. It checks if there are any appropriate RBAC annotations on the Pod making the request. If there are none, Kube2IAM serves up the default privilege set. These will be the privileges defined for the EC2 Instance Profile. However, if the Pod has a role annotation, it will be given the privileges defined in the matching AWS role.

Hands-on

In the example that follows, we will deploy two Pods; one with annotations (annotated) and another without (vanilla). We will use two AWS roles. The read-only role will have access to one S3 bucket only. The other read+write role will have read access to 2 buckets and read+write access to one bucket. The read-only role will be attached to the EC2 Instance Profile for the K8s worker node. The read+write role be standalone, but it will be extended to trust the read-only role. This sets the stage for Kube2IAM to discriminate between requests, giving read and/or write access to our Pods, as appropriate. In our example, the annotated Pod will be able to write one bucket and read two buckets, while the vanilla Pod will only be able to read one bucket.

The implementation artefacts can be downloaded from GitHub (use this link). I have put together what I think is a simple, and perhaps more explicit set of instructions below. Follow them step-by-step and you should end up with a working RBAC bridge using Kube2IAM. I guess one could write a script that automates all of these steps, but that is a task for another day, or perhaps someone else.

Process

  1. Create a policy (nettech-s3-read-only); use the file nettech-ec2-instance-profile.json for the policy definition/contents
  2. Create a role (nettech-s3-read-only); the role should refer to the policy in step #1
  3. Create an EC2 instance profile (nettech-instance-profile) for the AWS node(s); the instance profile should refer to the role you defined in step #2, forming a chain:
    nettech-instance-profile==>nettech-s3-read-only(role)==>nettech-s3-read-only(policy).
      Use the following aws-cli commands:
      aws iam create-instance-profile –instance-profile-name nettech-instance-profile
      aws iam add-role-to-instance-profile –instance-profile-name nettech-instance-profile –role-name nettech-s3-read-only
  4. Create a second read+write S3 policy and role (nettech-s3-read-write). Use the file nettech-s3-read-write.json for the policy definition/contents
  5. Extend the trust relationship on the read+write S3 role such that it can be assumed by the read-only role, forming a link:
    nettech-s3-read-write(role)<==trust==nettech-s3-read-only(role).
      In IAM console, select the read+write role
      Select the “Trust relationships” tab, and then click on the “Edit trust relationships” button
      In the new window that opens, add the contents of the file nettech-s3-read-write-trust-relationship.json to the existing definition/contents
      Make sure to update the AWS account Id (01234567890) to your own
      Click on “Update Trust Policy” to save your changes
  6. Deploy or assign a worker node in your K8s (Rancher/Kops/..) cluster
  7. Configure or update the worker node to reference the EC2 Instance Profile (nettech-instance-profile) from step #3
      aws ec2 associate-iam-instance-profile –iam-instance-profile nettech-instance-profile –instance-id xxxxxxxxxx # replace xxxx with your instance Id, or use the AWS GUI to attach it
  8. Deploy Nginx vanilla and annotated (K8s Deployments). Use the file nginx-deployment.yaml from Rancher UI or kubectl on the command line
  9. Install aws-cli in each of the Nginx instances – Use the following commands (Linux):
      apt update
      apt install curl -y
      apt install unzip -y
      curl "https://awscli.amazonaws.com/awscli-exe-linux-x86_64.zip" -o "awscliv2.zip"
      unzip ./awscliv2.zip
      ./aws/install
  10. Verify that the host node has read access to the “nettech-helm-test” bucket, according to the EC2 profile from step #3. Connect to the host node (via Rancher UI or SSH) and run the aws s3 ls command.
      aws s3 ls nettech-helm-test
  11. Verify that both Pods have read access to the “nettech-helm-test” bucket. Connect to each Pod (via Rancher UI or kubectl) and run an aws s3 ls
      aws s3 ls nettech-helm-test
  12. Create/deploy ClusterRole & ClusterRoleBinding for the service account to be used by Kube2IAM. Use the file clusterRoleAndBinding.yaml
  13. Deploy Kube2IAM (K8s DaemonSet), with debugging enabled. Use the file kube2IAM-daemonSet.yaml
  14. Connect to the host node and access the command line. Check that only one IPTables rule exists on the worker node (for AWS metadata IP). Delete any duplicates to avoid confusing errors. This may happen if you redeploy the Kube2IAM Daemonset.
      sudo iptables -t nat -S PREROUTING | grep 169.254.169.254 # list all entries
      sudo iptables -t nat -D PREROUTING -d 169.254.169.254/32 -i docker0 -p tcp -m tcp –dport 80 -j DNAT –to-destination 10.43.0.1:8282 # delete any duplicates
      NB: (docker0) is the network interface, (10.43.0.1) is the IP address of the node/host, and (8282) is the Kube2IAM port
  15. Test the Nginx instances again
    • Verify that the host node still only has read access to “nettech-helm-test”, as defined as a default in the EC2 Profile role (nettech-s3-read-only)
    • Verify that the vanilla Nginx Deployment still only has read access to “nettech-helm-test”, as defined as a default in the EC2 Profile role (nettech-s3-read-only)
    • Verify that the annotated Nginx Deployment now has read access to “lanre.k8s.dev” and “nettech-helm-test” as well as read+write access to “lanre.k8s.dev”

Conclusion

An RBAC bridge of some sort is a necessity for all multi-tenant K8s clusters running on virtualised infrastructure such as AWS, Azure, GCP and others. Kube2IAM provides an effective solution for the AWS platform. This article identifies the issue that Kube2IAM resolves and shows a very simple, sandbox implementation. The article should serve as quick-start guide that is easy to grasp and quick to implement.

We live in a rapidly evolving technology environment. Kube2IAM has set a very sound foundation, but as always, there is always room for improvement; and I say that with all humility and respect for the developers. KIAM came up with a cacheing service to reduce latency and improve scalability, unfortunately, that solution is no longer being evolved. One would like to see similar functionality in Kube2IAM. One other improvement would be to move the annotations out of the Pod and into K8s roles. The preference being roles defined outside the namespace of the beneficiary Pod. This will reduce the attack surface for malicious code that might attempt a brute-force attack to find AWS roles that can be exploited.

Many thanks to Jerome Touffe-Blin @jtblin and his team for creating this ever-so-useful open-souce utility.


Oyewole, Olanrewaju J (Mr.)
Internet Technologies Ltd.
lanre@net-technologies.com
www.net-technologies.com

Securing our Hybrid Cloud

Cloud Infrastructure Security

Cloud Infrastructure SecurityIn a previous article, “One thousand servers, start with one click”, I described the design and implementation of a simple hybrid-Cloud infrastructure.  The view was from a high level, and I intend, God willing, to delve into the detail in a later instalment.  Before that though, I wanted to touch on the subject of hybrid Cloud security, briefly.

Having deployed resources in a private Cloud and on-premise, certain precautions should be taken to secure the perimeter and the green zone inside the two networks – Cloud and premise.  The diagram above paints the big picture.  It shows how, based on AWS security recommendations, minimal access/privilege is granted to each resource in the networks.  The focus here is on machine access, which is about the lowest level of security.  I will not delve into AWS policies, VPN configuration or on-premise firewall rules, as these are not black-and-white and the detail involved does not fit in with the goal for this article.

Here goes!  Reading the diagram and translating to words:

  1. It is convenient to use the Internet Gateway (public router) of your Cloud provider during development.  Once you are done with prototyping and debugging, it should be disabled or removed.  Switch to a NAT gateway (egress only router) instead.  Your servers can still connect to the outside world for patches, updates, etc. but you can control what sites are accessible from your firewall.  Switching to a NAT gateway also means that opportunist snoopers are kept firmly out.
  2. Open up port 443 for your Kubernetes (K8S) master node(s) and close all others – your cluster can even survive without the master node, so don’t by shy, lock it down.  Should the need arise, it is easy to temporarily change Cloud and premise firewall rules to open up port 22 (SSH) or others to investigate or resolve issues.  Master nodes in K8S master subnet should have access to all subnets within the cluster, but this does not include known service ports for the servers or databases.
  3. While your ESB/EI will have several reusable/shared artefacts, the only one that are of interest to your clients (partners) are the API and PROXY services.  For each one of these services, a Swagger definition should be created and imported into the API Manager (APIM).  All clients should gain access to the ESB/EI only through the interfaces defined in the APIM, which can be constrained by security policies and monitored for analytics.  Therefore, the known service access ports should be open to clients on the APIM, and as with the K8S master, all other ports should be locked down.
  4. Access to the known service ports on the ESB/EI should be limited to the APIM subnet(s) only, all other ports should be closed.
  5. The Jenkins CI/CD containers are also deployed to the same nodes as the ESB/EI servers, but they fall under different constraints.  Ideally, the Jenkins server should be closed off completely to access from clients.  It can be correctly configured to automatically run scheduled and ad-hoc jobs without supervision.  If this is a challenge, the service access port should be kept open, but only to access from within the VPN, ideally, a jump-box.
  6. Access to the cluster databases should be limited to the APIM and ESB/EI subnets only, and further restricted to known service ports – 3306 or other configured port.
  7. Access to the cluster NFS should be limited to the APIM, ESB/EI, and K8S-master subnets only, and further restricted to known service ports – 111, 1110, 2049, etc., or others as configured.
  8. On-premise firewall rules should be configured to allow access to SFTP, database, application and web-servers from the ESB/EI server using their private IP addresses over the VPN.
  9. Wherever possible, all ingress traffic to the private Cloud should flow through the on-premise firewall and the VPN.  One great benefit of this approach is that it limits exposure; there are fewer gateways to defend.  There are costs though.  Firstly, higher latencies are incurred for circuitous routing via the VPN rather than direct/faster routing through Cloud-provider gateways.  Other costs include increased bandwidth usage on the VPN, additional load on DNS servers, maintenance of NAT records, and DNS synchronisation of dynamic changes to nodes within the cluster.
  10. ADDENDUM: Except for SFTP between the ESB/EI server and on-premise SFTP servers, SSH/port-22 access should be disabled.  The Cloud infrastructure should be an on-demand, code-driven, pre-packaged environment; created and destroyed as and when needed.

And that’s all folks! Once again, this is not an exhaustive coverage on all the aspects of security required for this hybrid-Cloud.  It is rather a quick run-through of the foundational provisions.  The aim being to identify a few key provision that can be deployed very quickly and guarantee a good level of protection on day one.  All of this builds on a principle adopted from AWS best practise. The principle states that AWS is responsible for the security of the Cloud while end-users are responsible for security in the Cloud. The end-user responsibility of Cloud security begins with another principle: access by least privileges. This means that for a given task, the minimum privileges should be granted to the most restricted community to which one or more parties (man or machine) is granted membership.


Oyewole, Olanrewaju J (Mr.)
Internet Technologies Ltd.
lanre@net-technologies.com
www.net-technologies.com
Mobile: +44 793 920 3120

AWS vs Oracle Cloud – My Experience

Oracle Cloud

Preamble

Having had a good impression from my use of Amazon Web Services (AWS), I decided to take a look at Oracle Cloud. AWS is of course the market leader but Oracle, Microsoft et al have joined the fray with competing services. What follows is nothing like a Gartner report, rather it is my personal experience of the Oracle and AWS services, as an end user. AWS is already well known and is perhaps the benchmark by which all others are presently measured. This article maintains that same perspective. The narrative is of my experience of Oracle Cloud and how it compares with AWS.  To keep this brief, I will only mention the cons.

Setting Up

As with every online service, Cloud or otherwise, you need to sign up and configure an account with the provider. The Oracle Cloud account set up involved more steps than the AWS. The telling difference though was in the time it took for the account to be available for use. Whereas the AWS account was all ready to go within a day, it took about 3 working days for my Oracle account.

The second difference was in communication. AWS sent me one email with all I needed to get started; Oracle sent me about 5 emails, each with useful information. I had some difficulty logging on to the Oracle service at first. But this was because I thought, wrongly, that the 3 emails I had received contained all that I needed to log in. The 4th email was the one I needed and with it in hand, login was easy and I could start using the serivces – the 5th email was for the VPN details.

Oracle Cloud Services

Having set up the account, I was now able to login and access the services. I describe my experience under four headings: user interface, service granularity, provisioning and pricing.

:User Interface

I will describe the interface usability in three aspects: consistency, latency, and reliability.  First is consistency.  On logging in to the Oracle Cloud, there is an icon on the top left hand corner that brings up the dashboard.  This is similar to AWS.  However, clicking that same button in the default, database, storage and SOA home pages results in a different list of items in the dashboard display.  This can be confusing as users may think they have done something wrong, or lost access to one of their cloud services.  The second, latency, is also a big problem with some in-page menus.  Response time for drop-down lists can be painfully slow and there is no visual indicator (hourglass) of background processing.  In extreme cases, latency becomes an issue of reliability.  There are times when in-page menus simply failed to display despite several clicks and page refreshes.

:Service Granularity

The area of concern is IaaS, and the two services I had issue with were compute and storage.  The choice of OS, RAM, CPU, etc. available when selecting a compute image is quite limited.  Mostly Oracle Linux and a chained increase in RAM and CPU specifications.  When creating storage; it appears that there is only one “online” storage class available – standard container.  The usage of the terms “container” and “application container” was a bit confusing in this context.  This is especially so when trying to create storage for a database that will be used by Oracle SOA Cloud.

:Provisioning

Provisioning is the fulfilment of the request to create a service package (IaaS, PaaS or SaaS).  The time it took to create a database (PaaS) instance was in excess of 30 minutes.  Perhaps this was due to the time of day and high concurrency.  Nevertheless, given that I could run a script to do same on my laptop within 10 minutes, one would expect equal or better from the cloud.  The delay is even longer with creation of the Oracle SOA Cloud instance; this took well over 2 hours to complete.  Scripted creation of instances would be much quicker on a modest PC.  For cloud services, images should provide even quicker initialisation of instances from templates.

:Pricing

This could be the elephant in the room.  Whereas options were few and insufficient in IaaS, the array of pricing for almost identical PaaS offerings was long and rather confusing.  Unlike AWS, there are only two schedules: hourly or monthly.  There are no options to reserve or bid for capacity.  Finally, even the lowest prices are quite high from the perspective of an SME.  The granularity of billing needs to be reduced or the composition of IaaS and PaaS should give greater flexibility.  Either way, entry prices need to be attractive to a larger segment of the market.

Summary

A great impediment to comparison is the short trial period allowed for Oracle Cloud services.  The 30 day allowance is insufficient, except for those with a prepared plan and a dedicated resource.  Such an exercise would in itself amount to no more than benchmarking, leaving little room for gaining a real feel for the services.

We should set aside the latency issues in setup, user interface and provisioning.  These are easy problems to resolve and it is likely that Oracle will fix these very soon.  The output of provisioning for Oracle-specific PaaS and SaaS services was very good and compares favourably with AWS.  One advantage of the Oracle PaaS is the simple configuration of requisite security to gain access for the first time.  This meant that the PaaS services were very quickly available for use without further tweaking of settings.  The shortcoming, as previously stated, is that provisioning can take quite a while.  Overall, the use of the Oracle PaaS was seamless and integration with on-premise resources was easy.  The only exception being JDeveloper, which could not integrate directly with Oracle SOA Cloud instances.

Competition

AWS has the benefit of early entry and has a far richer set of services.  But the feature set is not an issue since Oracle is not into Cloud as an end, but as a means to extend the availability of existing products and services.  However, even in the limited subset where there is an overlap, AWS provides finer granularity of services/features, better interface usability, and a much more alluring pricing model.

Oracle has fought many corporate and technology battles over the years.  The move to Cloud space is yet another frontier and changes will be needed in the following areas.

  • Open up the options and granularity of IaaS offerings
  • Address significant latencies in provisioning PaaS services
  • Revise the pricing model to accommodate SMEs
  • Totally refresh the flow and performance of web pages

The Cloud has arrived, like the Internet, underestimated initially, but it promises likewise to revolutionise IT.  This market will certainly benefit from competition and I surely hope that Oracle will take up the gauntlet and offer us a compelling alternative to AWS – horizontal and vertical.

God bless!

Oyewole, Olanrewaju J (Mr.)
Internet Technologies Ltd.
lanre@net-technologies.com
www.net-technologies.com
Mobile: +44 793 920 3120

Impressive Amazon Web Services: First Glance

Impressive Amazon Web Services (AWS)

Amazon Web Services: Background

Amazon Web Services (AWS) have revolutionised the way we view IT provisioning.  AWS makes so many things easier, and often cheaper too.  The benefits scale from the SME right up to corporates; no segment is left out.  Complexity is abstracted away, and with a little effort, large and/or complex systems can be built with a few clicks and some configuration.

Architecture

We decided to take a quick look and see just how much the AWS could offer low-budget SMEs.  Using our company’s existing platform as the subject.  We have one Oracle database and a handful of MySQL databases; an application server and a Web Server fronting for the application server and several CMS-driven sites.  The application server runs Java web services that use data from the Oracle database.  The web server hosts the pages for the Java application.  It also servers a number of WordPress/PHP sites that run on data from the MySQL databases.  The logical view is illustrated in the diagram below:
AWS nettech Logical ViewWe could map the logical view to one-to-one service units in AWS, or rationalise the target resources used.  AWS provides services for computation for web and application (EC2) Shell scripting (OpsWorks), data (RDS) and static web and media (S3), and other useful features; Elastic IP, Lambda, IAM.  So, we have the option to map each of the logical components to an individual AWS service.  This would give us the most flexible deployment and unrivalled NFR guarantees of security, availability and recoverability.  However, there would be a cost impact, increased complexity, and there could be issues with performance.

Solutions

Going back to our business case and project drivers; cost reduction is highlighted.  After some consideration two deployment options were produced (below), and we therefore chose the consolidated view. The Web, application and data components were targeted at the EC2 instance as they all require computation facilities.  All the media files were targeted at the S3 bucket.  The database data files could have been located on the S3 bucket but for the issue of latency, and costs that would accumulate from repeated access.

AWS nettech physical viewThe media files were targeted to the S3 bucket due to their number/size (several Gbs).  The separation ensures that the choice of EC2 instance is not unduly influenced by storage requirements.  The consolidated view allows us to taste-and-see; starting small and simple.  Over time we will monitor, review and if need be, scale-up or scale-out to address any observed weaknesses.

Migration

Having decided on the target option, the next thing was to plan the migration from the existing production system.  An outline of the plan follows:

  1. Copy resources (web, application, data, media) from production to a local machine – AWS staging machine
  2. Create the target AWS components  – EC2 and S3, as well as an Elastic IP and the appropriate IAM users and security policies
  3. Transfer the media files to the S3 bucket
  4. Initialise the EC2 instance and update it with necessary software
  5. Transfer the web, application and data resources to the EC2 instance
  6. Switch DNS records to point at the new platform
  7. Evaluate the service in comparison to the old platform

AWS nettech physical view III

Implementation

The time arrived to actualise the migration plan.  A scripted approach was chosen as this allows us to verify and validate each step in detail before actual execution.  Automation also provided a fast route to the status quo ante, should things go wrong.  Once again we had the luxury of a number of options:

  • Linux tools
  • Ansible
  • AWS script (Chef, bash, etc.)

Given the knowledge that we had in-house and the versatility of the operating system (OS) of the staging machine, Linux was chosen.  Using a combination of AWS command line interface (CLI) tools for Linux, shell scripts, and the in-built ssh and scp tools the detailed migration plan was to be automated.  Further elaboration of the migration plan into an executable schedule produced the following outline:

  1. Update S3 Bucket
  2. Copy all web resources (/var/www) from the staging machine to the S3 bucket
  1. Configure EC2 Instance
  2. Install necessary services: apt update, Apache, Tomcat, PHP, MySQL
  3. Add JK module to Apache, having replicated required JK configuration files from staging machine
  4. Enable SSL for Apache … having replicated required SSL certificate files
  5. Fix an incorrect default value in Apache’s ssl.conf
  6. Configure group for ownership of web server files www
  7. Configure file permissions in /var/www
  8. replicate MySQL dump file from staging machine
  9. Recreate MySQL databases, users, tables, etc.
  10. Restart services: MySQL, Tomcat, Apache
  11. Test PHP then remove the test script …/phpinfo.php
  12. Install the S3 mount tool
  13. Configure the S3 mount point
  14. Change owner, permissions on the S3 mounted directories and files – for Apache access
  15. Replicate application WAR file from staging machine
  16. Restart services: MySQL, Tomcat, Apache
  1. Finalise Cutover
  2. Update DNS records at the DNS registrar and flush caches
  3. Visit web and application server pages

Anonymised scripts here: base, extra

A few observations are worthy of note, regarding the use of S3.  AWS needs to make money on storage.  It should therefore not be surprising that updates to permissions/ownership, in addition to the expected read/write/update/delete, count towards usage.  Access to the S3 mount point from the EC2 instance can be quite slow.  But there is a workaround: use aggressive caching in the web and application servers.  Caching also helps to reduce the ongoing costs of repeated reads to S3 since the cached files will be hosted on the EC2 instance.  Depending on the time of day, uploads to S3 can be fast or very slow.

Change Management

The cut-over to the new AWS platform was smooth. The web and application server resources were immediately accessible with very good performance for the application server resources.  Performance for the web sites with resources on S3 was average.  Planning and preparation took about two days.  The implementation of the scripts for migration automation took less than 30 minutes to complete.  This excludes the time taken to upload files to the S3 bucket and update their ownership and permissions.  Also excluded is the time taken to manually update the DNS records and flush local caches.

Overall, this has been a very successful project and it lends great confidence to further adoption of more solutions from the AWS platform.

The key project driver, cost-saving, was realised, with savings of about 50% in comparison with the existing dedicated hosting platform.  Total cost of ownership (TCO) improves comparatively as time progresses.  The greatest savings are in the S3 layer, and this might also improve with migration to RDS and Lightsail.

In the next instalment, we will be looking to extend our use of AWS from the present IaaS to PaaS.  In particular, comparison of the provisioning and usability of AWS and Oracle cloud for database PaaS.  Have a look here in the next couple of weeks for my update on that investigation.


Oyewole, Olanrewaju J (Mr.)
Internet Technologies Ltd.
lanre@net-technologies.com
www.net-technologies.com
Mobile: +44 793 920 3120